Monday, November 10, 2014

Open JSON responses in IE

Internet explorer doesn’t like opening JSON response by default and will normally ask you to save the file. if you apply the following registry changes, then the JSON response will open in IE nicely. Although i think Firefox handles this better with nice formatting over CHROME or IE.


anyhow, here’s the reg fix.(you may want to back up these keys first if you want to revert)

Windows Registry Editor Version 5.00
;
; Tell IE to open JSON documents in the browser. 
; 25336920-03F9-11cf-8FD0-00AA00686F13 is the CLSID for the "Browse in place" .
; 

[HKEY_CLASSES_ROOT\MIME\Database\Content Type\application/json]
"CLSID"="{25336920-03F9-11cf-8FD0-00AA00686F13}"
"Encoding"=hex:08,00,00,00

[HKEY_CLASSES_ROOT\MIME\Database\Content Type\application/x-json]
"CLSID"="{25336920-03F9-11cf-8FD0-00AA00686F13}"
"Encoding"=hex:08,00,00,00

[HKEY_CLASSES_ROOT\MIME\Database\Content Type\text/json]
"CLSID"="{25336920-03F9-11cf-8FD0-00AA00686F13}"
"Encoding"=hex:08,00,00,00

Friday, November 7, 2014

Surface Pro 3 – No Sleep Option

Just bought a new Surface Pro 3 and have been having some weird behaviour. Seems to start after i had finished installing Visual Studio 2013.

Was bugging me that the sp3 didn’t power up quickly or resume nicely. Turns out it was effectively powering off all the time as sleep mode was not available. Was also having some weird behaviour where touching the keyboard the keys would light up but the screen would stay blank for ages until I pressed a few more keys. Plus closing the cover would effectively hibernate my machine.

Further investigation highlighted that when I install windows phone emulators it enabled hyper-v which runs on the metal with win 8.1 above it. This disabled sleep mode as an available option!! (would be a problem on any win 8.1 machine, not just surfaces)

So best way around this is to use an admin command to disable hyper-v (http://winsupersite.com/mobile-devices/surface-pro-3-tip-hyper-v-vs-connected-standby)

Better still, is to create a new boot entry with hyper-v disabled and then select which you need at boot up. (http://www.hanselman.com/blog/SwitchEasilyBetweenVirtualBoxAndHyperVWithABCDEditBootEntryInWindows81.aspx)

I’ve actually done the opposite of what Scott Hanselman said as I want my default win 8.1 boot to be hypervisor disabled and for my ‘other os’ option to be enabled. Either way.. now works as advertised and resumes from sleep sub-second and closing the cover sends it to sleep.

So I did this..

C:\> bcdedit /set hypervisorlaunchtype off
The operation completed successfully.

Then (note that the GUIDs will be different on your machine)

C:\>bcdedit /copy {current} /d "Hyper-V Enabled"
The entry was successfully copied to {ff-23-113-824e-5c5144ea}.
C:\>bcdedit /set {ff-23-113-824e-5c5144ea} hypervisorlaunchtype auto
The operation completed successfully.

Also then went into advanced settings and changed default start-up delay from 30 seconds to 5.

Anyhow.. interesting!

Thursday, July 31, 2014

Failure to load packages creating an MVC project

Whenever I create a new MVC project, I am getting an error loading various packages for Powershell, entity framework and Jquery.

The error: The following packages failed to install from 'C:\Program Files\Microsoft ASP.NET\ASP.NET MVC 5\Packages'

I noticed a reference looking for C:\Program Files (x86)\7-Zip\7z.exe, which is pretty strange and subsequently found that 7Zip was installed in the “c:\program files” hive and not in the x86 one. I copied the 7zip folder to the x86 folder structure and then restarted Visual Studio. Now it works as expected.

I can only surmise that by installing 7Zip i have messed with the natural order of things somehow. Either way, copying to the x86 folder fixed things for me.

Something to remember if you get the same issue.

Matt

p.s. i haven’t had this issue on my Windows 7 box but experienced this on the Windows 8 ‘beta’ image i am currently testing for rollout at work. I don’t remember if i installed 7Zip myself or if it was already installed. I have a sneaky suspicion it was already there and maybe the directory it was installed to was incorrect?

Friday, September 27, 2013

Log Parser Studio

If you have ever used Log Parse (go try it if you haven’t) then you know it is a really powerful for obtaining valuable information from IIS, Exchange and other logs. Essentially you use SQL-like queries to query one or more logs and return data and even charts. These sql scripts can be  run from the command line or saved as files. The only thing missing is a GUI to front-end Log Parser and a library of scripts. Enter “Log Parser Studio”!

Log Parser Studio gives you the following features:

  • Store all queries in one location with informative descriptions
  • Edit and create new queries and then save them for later
  • Search for queries
  • Import and export from the library
  • Execute queries
  • Create and run batches of queries (which will run multi-threaded)
  • Scheduling of queries to run unattended (automation)
  • Supports various keyboard short-cuts.

Supported Input Types

Full support for W3SVC/IIS, CSV, HTTP Error and basic support for all built-in Log Parser 2.2 input formats. In addition, some custom written LPS formats such as Microsoft Exchange specific formats that are not available with the default Log Parser 2.2 install.

lps1

Query Library

lps2

Edit and results screen


Go get LPS now! (needs Log Parser also.)

Monday, August 12, 2013

Open multiple excel documents in different instances of excel

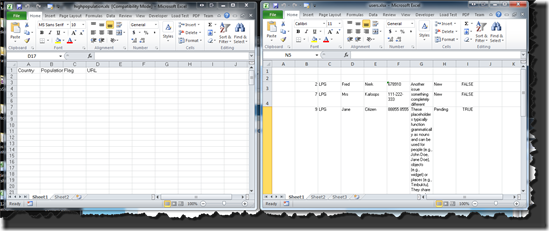
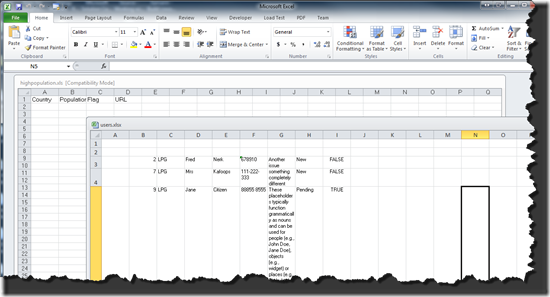
default functionality for excel will open all new spread sheets in the same instance of excel. this is a special pain when you need to copy or compare spread sheets. One work-around is to open a new instance of excel and then do a file open, however this is tedious.

The solution is modify the registry to give you a new option in the right-click context menu for excel files to open these in a new instance of excel. (Cudos to http://www.online-tech-tips.com/ms-office-tips/how-to-open-a-new-instance-of-excel-2007-workbooks/ for the original article on how to do this for excel 2007)
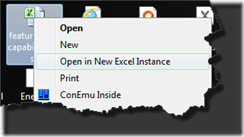
context

Do this by putting the following code into a text file and then renaming the text file to have a .reg file extension. Backup your registry and then run the reg file. This will add the context menu option to ‘Open in New Excel Instance’.

This should work for Office 2010 and Office 2007 excel files. The code below is setup to open excel 2010 32bit on a 64bit OS. If you are running the 64bit version of office or running a 32bit OS then you need to remove any instances of “ (x86)” from the script. If you are running a different version of office than 2010 then you need to make other changes. (I’m not documenting these here for now).

So, you go from this:
oneinstance

To this:

dualexcel

The default functionality for opening excel documents is not be changed here. We are just adding the context menu item. I have tested this on Windows 7 64 and Windows XP 32bit, both running Office 2010 32bit.

DISCLAIMER: There is NO support for this and you make any registry changes AT YOUR OWN RISK.

Here’s the registry script. Enjoy!

Matt


Windows Registry Editor Version 5.00

[HKEY_CLASSES_ROOT\Excel.Backup\shell\Open_in_New_Excel_Instance]
@="Open in New Excel Instance"

[HKEY_CLASSES_ROOT\Excel.Backup\shell\Open_in_New_Excel_Instance\command]
@="\"C:\\Program Files (x86)\\Microsoft Office\\Office14\\EXCEL.EXE\" \"%1\""

[HKEY_CLASSES_ROOT\Excel.OpenDocumentSpreadsheet.14\shell\Open_in_New_Excel_Instance]
@="Open in New Excel Instance"

[HKEY_CLASSES_ROOT\Excel.OpenDocumentSpreadsheet.14\shell\Open_in_New_Excel_Instance\command]
@="\"C:\\Program Files (x86)\\Microsoft Office\\Office14\\EXCEL.EXE\" \"%1\""

[HKEY_CLASSES_ROOT\Excel.Sheet.14\shell\Open_in_New_Excel_Instance]
@="Open in New Excel Instance"

[HKEY_CLASSES_ROOT\Excel.Sheet.14\shell\Open_in_New_Excel_Instance\command]
@="\"C:\\Program Files (x86)\\Microsoft Office\\Office14\\EXCEL.EXE\" \"%1\""

[HKEY_CLASSES_ROOT\Excel.Sheet.8\shell\Open_in_New_Excel_Instance]
@="Open in New Excel Instance"

[HKEY_CLASSES_ROOT\Excel.Sheet.8\shell\Open_in_New_Excel_Instance\command]
@="\"C:\\Program Files (x86)\\Microsoft Office\\Office14\\EXCEL.EXE\" \"%1\""

[HKEY_CLASSES_ROOT\Excel.SheetBinaryMacroEnabled.14\shell\Open_in_New_Excel_Instance]
@="Open in New Excel Instance"

[HKEY_CLASSES_ROOT\Excel.SheetBinaryMacroEnabled.14\shell\Open_in_New_Excel_Instance\command]
@="\"C:\\Program Files (x86)\\Microsoft Office\\Office14\\EXCEL.EXE\" \"%1\""

[HKEY_CLASSES_ROOT\Excel.SheetMacroEnabled.14\shell\Open_in_New_Excel_Instance]
@="Open in New Excel Instance"

[HKEY_CLASSES_ROOT\Excel.SheetMacroEnabled.14\shell\Open_in_New_Excel_Instance\command]
@="\"C:\\Program Files (x86)\\Microsoft Office\\Office14\\EXCEL.EXE\" \"%1\""

[HKEY_CLASSES_ROOT\Excel.Template\shell\Open_in_New_Excel_Instance]
@="Open in New Excel Instance"

[HKEY_CLASSES_ROOT\Excel.Template\shell\Open_in_New_Excel_Instance\command]
@="\"C:\\Program Files (x86)\\Microsoft Office\\Office14\\EXCEL.EXE\" \"%1\""

[HKEY_CLASSES_ROOT\Excel.Template.8\shell\Open_in_New_Excel_Instance]
@="Open in New Excel Instance"

[HKEY_CLASSES_ROOT\Excel.Template.8\shell\Open_in_New_Excel_Instance\command]
@="\"C:\\Program Files (x86)\\Microsoft Office\\Office14\\EXCEL.EXE\" \"%1\""

[HKEY_CLASSES_ROOT\Excel.TemplateMacroEnabled\shell\Open_in_New_Excel_Instance]
@="Open in New Excel Instance"

[HKEY_CLASSES_ROOT\Excel.TemplateMacroEnabled\shell\Open_in_New_Excel_Instance\command]
@="\"C:\\Program Files (x86)\\Microsoft Office\\Office14\\EXCEL.EXE\" \"%1\""

[HKEY_CLASSES_ROOT\Excel.Workspace\shell\Open_in_New_Excel_Instance]
@="Open in New Excel Instance"

[HKEY_CLASSES_ROOT\Excel.Workspace\shell\Open_in_New_Excel_Instance\command]
@="\"C:\\Program Files (x86)\\Microsoft Office\\Office14\\EXCEL.EXE\" \"%1\""

[HKEY_CLASSES_ROOT\Excel.OpenDocumentSpreadsheet.12\shell\Open_in_New_Excel_Instance]
@="Open in New Excel Instance"

[HKEY_CLASSES_ROOT\Excel.OpenDocumentSpreadsheet.12\shell\Open_in_New_Excel_Instance\command]
@="\"C:\\Program Files (x86)\\Microsoft Office\\Office14\\EXCEL.EXE\" \"%1\""

[HKEY_CLASSES_ROOT\Excel.Sheet.12\shell\Open_in_New_Excel_Instance]
@="Open in New Excel Instance"

[HKEY_CLASSES_ROOT\Excel.Sheet.12\shell\Open_in_New_Excel_Instance\command]
@="\"C:\\Program Files (x86)\\Microsoft Office\\Office14\\EXCEL.EXE\" \"%1\""

[HKEY_CLASSES_ROOT\Excel.Sheet.8\shell\Open_in_New_Excel_Instance]
@="Open in New Excel Instance"

[HKEY_CLASSES_ROOT\Excel.Sheet.8\shell\Open_in_New_Excel_Instance\command]
@="\"C:\\Program Files (x86)\\Microsoft Office\\Office14\\EXCEL.EXE\" \"%1\""

[HKEY_CLASSES_ROOT\Excel.SheetBinaryMacroEnabled.12\shell\Open_in_New_Excel_Instance]
@="Open in New Excel Instance"

[HKEY_CLASSES_ROOT\Excel.SheetBinaryMacroEnabled.12\shell\Open_in_New_Excel_Instance\command]
@="\"C:\\Program Files (x86)\\Microsoft Office\\Office14\\EXCEL.EXE\" \"%1\""

[HKEY_CLASSES_ROOT\Excel.SheetMacroEnabled.12\shell\Open_in_New_Excel_Instance]
@="Open in New Excel Instance"

[HKEY_CLASSES_ROOT\Excel.SheetMacroEnabled.12\shell\Open_in_New_Excel_Instance\command]
@="\"C:\\Program Files (x86)\\Microsoft Office\\Office14\\EXCEL.EXE\" \"%1\""

[HKEY_CLASSES_ROOT\Excel.Template\shell\Open_in_New_Excel_Instance]
@="Open in New Excel Instance"

[HKEY_CLASSES_ROOT\Excel.Template\shell\Open_in_New_Excel_Instance\command]
@="\"C:\\Program Files (x86)\\Microsoft Office\\Office14\\EXCEL.EXE\" \"%1\""

[HKEY_CLASSES_ROOT\Excel.Template.8\shell\Open_in_New_Excel_Instance]
@="Open in New Excel Instance"

[HKEY_CLASSES_ROOT\Excel.Template.8\shell\Open_in_New_Excel_Instance\command]
@="\"C:\\Program Files (x86)\\Microsoft Office\\Office14\\EXCEL.EXE\" \"%1\""

[HKEY_CLASSES_ROOT\Excel.TemplateMacroEnabled\shell\Open_in_New_Excel_Instance]
@="Open in New Excel Instance"

[HKEY_CLASSES_ROOT\Excel.TemplateMacroEnabled\shell\Open_in_New_Excel_Instance\command]
@="\"C:\\Program Files (x86)\\Microsoft Office\\Office14\\EXCEL.EXE\" \"%1\""

[HKEY_CLASSES_ROOT\Excel.Workspace\shell\Open_in_New_Excel_Instance]
@="Open in New Excel Instance"

[HKEY_CLASSES_ROOT\Excel.Workspace\shell\Open_in_New_Excel_Instance\command]
@="\"C:\\Program Files (x86)\\Microsoft Office\\Office14\\EXCEL.EXE\" \"%1\""

Monday, August 5, 2013

Copy SharePoint list items from one list to another and retain full version history and attachments.

Here’s some ‘rough n ready’ code to perform a copy of all list items from one list to another. It will retain all version history, dates, authors, editors, etc. It will also allow you to copy fields from the source list to the target list where the target list field has changed it’s name (must be of the same data type though). In addition, any file attachments for list items are also migrated. Note that file attachments are not versioned. Make sure the destination list has versioning turned on if the source list has versioning enabled.

What doesn’t this do? it doesn’t copy views (personal or public) and it doesn’t copy any permissions. It is also not very robust code. (it’s just a proof of concept at the moment, but feel free to clean it up!)

anyhow.. this is not production worthy code, but it does work. thought it may be useful to someone down the track. Let me know if you use it! 8)


using System;
using System.Collections.Generic;
using System.Linq;
using System.Text;
using Microsoft.SharePoint;

namespace MigrateListItemsAndVersions
{
    class Program
    {

        // ****** Setup parameters *******
        static string siteURL = "http://server/site/";
        static string source = "sourcelistname";
        static string dest = "destinationlistname";
        // this is a mapping dictionary to be used when the fields are different names in the target list. Only list the fields that have changed (must be same type to work!!).
        static Dictionary<string, string> fieldMapping = new Dictionary<string, string>
            {
                {"oldcolname","newcolname"}
            };
        // ****** Setup parameters *******


        static void Main(string[] args)
        {

            using (SPSite site = new SPSite(siteURL))
            {
                using (SPWeb web = site.OpenWeb())
                {
                    web.AllowUnsafeUpdates = true;
                    SPList sourceList = web.Lists[source];
                    SPList destList = web.Lists[dest];
                    foreach (SPListItem sourceItem in sourceList.Items)
                    {
                        CopyItem(sourceItem, destList);
                    }
                }
            }
        }

        public static SPListItem CopyItem(SPListItem sourceItem, SPList destinationList)
        {
            SPListItem targetItem = destinationList.Items.Add();
      
            //loop over the soureitem, restore it
            for (int i = sourceItem.Versions.Count - 1; i >= 0; i--)
            {
              
                //set the values into the target list
                foreach (SPField sourceField in sourceItem.Fields)
                {
                    SPListItemVersion version = sourceItem.Versions[i];

                    if ((!sourceField.ReadOnlyField) && (sourceField.InternalName != "Attachments"))
                    {
                        targetItem[Mapper(sourceField.Title)] = version[sourceField.Title];
                    }
                    else if (sourceField.Title == "Created" ||
                        sourceField.Title == "Created By" ||
                        sourceField.Title == "Modified" ||
                        sourceField.Title == "Modified By") {
                            targetItem[sourceField.Title] = version[sourceField.Title];
                    }
                }

                //update the target item and loop over the the next version

                targetItem.Web.AllowUnsafeUpdates = true;
                targetItem.Update();
                targetItem.Web.AllowUnsafeUpdates = false;
            }

            // now check for attachments (not versioned) and copy
            foreach (string fileName in sourceItem.Attachments)
            {
                SPFile file = sourceItem.ParentList.ParentWeb.GetFile(sourceItem.Attachments.UrlPrefix + fileName);
                targetItem.Attachments.Add(fileName, file.OpenBinary());
            }

            targetItem.Web.AllowUnsafeUpdates = true;
            // perform a systemupdate so that a new version is not created
            targetItem.SystemUpdate();
            targetItem.Web.AllowUnsafeUpdates = false;
            return targetItem;
        }

        // updates the output fieldname if the destination list has different fields (must be the same type though!)
        public static string Mapper(string fieldNameIn)
        {
            // if not in the mapping dictionary then use the infieldname as the field to write to.
            string fieldNameOut = fieldNameIn;
            if (fieldMapping.ContainsKey(fieldNameIn)) fieldNameOut = fieldMapping[fieldNameIn];
            return fieldNameOut;
        }
    }
}

Tuesday, March 19, 2013

Connecting to the node package repository behind an authenticated proxy server

If you are going to use node and want to install packages, but are behind an authenticated proxy server, you will likely get errors like ‘ETIMEDOUT’ when you make the call. to get around this, you need to tell node how to authenticate. This is easy with the following command from the dos prompt (running as administrator).

npm config set proxy http://domain\username:password@proxyserver:port


for example:

npm config set proxy http://northwind\bloggsj:secretpassword@proxy.northwind.com:8080

Friday, January 4, 2013

Samsung Series 7 ultra – refresh

Samsung Series 7 Ultra has been refreshed with 8hr battery, up to 16gb ram, 4g connectivity, discrete AMD Radeon gfx card and 256gb ssd. I know what i'm going to get when it comes out.

http://www.ubergizmo.com/2013/01/samsung-series-7-ultra/

Matt

Tuesday, July 3, 2012

Windows 8 Professional Upgrade cost to be $40US

Am not sure what the AUD price will be, however this is pretty competitively priced and pretty groovy in that you can upgrade from any version of Windows XP and up. (hardware supporting)

http://windowsteamblog.com/windows/b/bloggingwindows/archive/2012/07/02/upgrade-to-windows-8-pro-for-39-99.aspx

Tuesday, June 19, 2012

Wednesday, June 6, 2012

Cydia Apps I use on my ‘Jail Broken’ iPad

  • cydelete - Allows Cydia apps to be deleted, via wiggle mode, like any other app ★★★★★
  • dospad - run dos applications on your iPad ★★
  • mame4all – M.A.M.E game emulator - just need to load some roms ★★★★★
  • quake 3 arena HD - quake for the iPad - comes with freeware .pak file, but can load full files ★★
  • truprint (Paid App) - print to almost any network attached print ★★★★★
  • activator - allows multiple gestures to be set to active features ★★
  • folderenhancer (paid app) - allows unlimited items in a folder and folders within folders ★★★★★
  • dreamboard (Custom themes) ★★★★
  • sprintomize 2 (customise springboard) ★★★★
  • SBSettings (customise springboard) ★★★★
  • Winterboard (customise springboard and theming) ★★
  • VLC Media Player - plays almost anything ★★★★★ (but i use GoodPlayer instead - from app store)
  • Display Recorder (Paid App) - Allows recording of iPad sessions and remote access to iPad desktop ★★★★★
  • xbackup - backup Cydia apps ★★★
  • installous 4 - alternate installer to Cydia. ★★
  • cydia (Installed as a part of the 'Jail Break') ★★★★★
  • ifile (Paid App) - gives full access to the IOS file system ★★★★★
  • BTStack - alternate blue tooth stack ★
  • fullscreen for safari (alt source) - allows safari to be toggled full screen ★★★★★
  • AirBlue Sharing (Paid App) - alternate Bluetooth stack. also adds fuctionality to pair with any device and file transfer. ★★★
  • SplitMail - shows emails window and preview window when in portrait mode. ★★★★★
  • OpenSSH - gives a nice SSH terminal ★★★
  • FullForce (iPhone apps get scaled to full screen automatically – See RetinaPad!) ★★
  • Barrell (Paid App) - themed effects for icons on the springboard ★★★
  • KillBackGround - allows you to kill selected or all background apps ★★★★
  • Wififofum - Wi-Fi sniffing and detection ★★★★
  • UserAgent Faker - sends different user agents in browser ★★★★
  • Gridlock (Paid app) - allows icons to be place anywhere on screen ★★★
  • IntelliScreenX (iPhone app) - news, email, alerts, weather, feeds on desktop or lock-screen ★★★
  • multiiconmover - allows multiple icons to be moved at once. ★★★★★
  • RetinaPad (Paid App) - allows iPhone apps to be full-screened on iPad. excellent rendition and better than ‘fullforce’. ★★★★★
  • OneByOne Safari – allows specific deletes of Safari and Search history instead of all at once. ★★★★


☆★

Monday, June 4, 2012

Windows 8 RC ‘To Go’. For real!?

So, as you all now know, there is a new Windows 8 release now available called ‘Release Preview’. I installed this on Friday night (1st June) and it is all running nicely. I also installed the ‘Release Candidate’ for Visual Studio 2012 ‘Ultimate’, however i will give my thoughts on that product another time.

On the surface, not a lot seems to have changed. Things are a little smother and snappier, there’s a few more items in the Windows Store and there’s a few breaking changes in the development API’s. Overall though, nothing standout. Unfortunately, the Windows ‘Personal Workspace Creator’ (pwcreator.exe) is still not there. 8(

PWCreator.exe is the wizard that will create a Windows 8 ‘To Go’ install on a compatible USB drive/stick.

I’ve been keen to try this functionality out, for real, for some time now. Unfortunately i just haven’t had the right hardware to do it. There are work arounds to this that approximate Windows 8 To Go features (see past posts), however i am not sure if this is really the same thing. Anyway, i now have some hardware that i think should really do it justice and I’m keen to try it out. The rest of this post is about how i got it working and my thoughts on the result.

Hardware requirements are pretty stringent, so i thought i would go all out. Recently I purchased a 250Gb SSD off Amazon, that i put in a nice 3rd party USB 3.0 external case, and thought this should be a good match. Here’s what I did.

  1. Installed a VM for Windows 8 RP Update:(can also use Consumer Preview)
  2. Copied over the PWCreator.exe (64bit) and associated files (you will need to get this from the developer preview)
  3. Enabled the VM (VMPlayer) to see the USB drive
  4. Update: Mount the ISO for Win8 Release Preview and copy the install.wim file from the sources directory to a location on your windows 8 vm.
  5. Ran the PWCreator.exe wizard, selected the drive and said ‘go’!
  6. Update: You may need to add a source location to point to the directory where you copied the install.wim file.
  7. Followed my nose to create and select partitions on the drive

Now, this is pretty much all that is needed, however it took a number of hours to complete. I think this is because of the size of my SSD?. Anyway, i came back this morning and it was all completed and i was able to attach the drive and boot up off it. Update: I ran this again, using the same USB drive, but on a different computer and it only took 45 minutes to complete. Perhaps my other PC was a lot slower or had an issue.

After booting up on this image and running through the initial Windows 8 setup, i now have a really nice Windows 8 ‘Release Preview’ image, which seems to all work fine. This includes a ‘bitlocked’ drive that cannot be accessed when i try to mount the drive from a different OS. I’m not sure if this is what a Windows 8 To Go image will look like, and won’t until Windows 8 ships, however it looks pretty darned close to it. Update: I disconnected the drive by accident whilst running and upon the next reboot i got a nice little warning message to be careful about doing that. The interesting thing is the warning message mentioned my ‘Windows 8 To Go’ setup!

Awesome!

Thursday, May 24, 2012

Windows 8 (To Go) bootable USB. “Putting it all together”

** Note / Disclaimer: I cannot guarantee any aspects of this post or damages you may do to your system from following any details, therein. These are simply my observations and what I have worked out to get Windows 8 running reasonably well off a USB drive in what i hope is a ‘similar’ way to the experience you will have with Windows 8 ‘to go’. If you want the ‘real’ experience, then you will need to wait for Windows 8 to ship and ensure that you purchase a supported USB drive!

On with the show..

Windows 8 has a great new feature called “Windows 8 To Go”. This allows you to install a fully functional copy of Windows 8 onto a USB drive and then boot it up on any x86 device. This is fantastic as it is not tied to running on a specific machine, is ‘bitlocked’ so the drive contents are secure and essentially, it allows you to run your personal or corporate Windows 8 image on any hardware you want. Whilst this sounds awesome to try out, there are quite a few gotchas currently.

  • The ‘Personal Workspace Creator’ utility (PWC.exe) for creating one of these USB bootable drives is not in the latest version of Windows 8 Consumer Preview. It was in a previous version (Developer preview) but has now, currently, been excluded from the Win8 CP image. (I did find the PWC.exe out in the wild and it does ‘seem’ to run on Windows 8 CP though)
  • The requirements for the USB stick that you can use are very strict. In fact, currently, there are only two USB drives available that are certified to work with Windows 8 To Go. *AND* The PWC.exe utility will check for these requirements and not run if these are not met. See my previous post on the two certified sticks available. The two USB bootable drives certified for Windows 8 to Go
  • There have been some articles about using the Windows AIK toolkit utility, ‘imagex.exe’, to create USB bootable images. http://tweaks.com/windows/52279/how-to-create-a-windows-to-go-usb-drive/ Whilst these ‘seem’ to work ok, the resultant installed version of windows 8 is slightly crippled. This is because the ‘removable drive’ bit is set to being on on almost all USB drives. Windows 8 detects this and then locks out functionality around running Windows Update, The Windows Store and Setting up Windows to use a Live ID to logon. Not ideal!

So what can be done?

I found an excellent post by Bennett Adelson on how to get around this http://bennettadelson.wordpress.com/tag/windows-8-to-go/. In summary, you create a ‘Virtual Disk’ of type ‘Fixed’ on the USB drive and then edit the boot info of the USB to load the VHD. You then install Windows 8, using the ‘imagex.exe’ process that others have used and the result is you have Windows 8 booting off a USB key and fully functional!

There are some very important points here:

  • Follow Bennett’s instructions to the letter!
  • Make sure you do this on a pre-installed copy of Windows 8 running on your machine or in a virtual machine.
  • This could take a couple of hours to complete, depending upon the size and speed of your USB.
  • The result of this process is not the ‘true’ Windows 8 To Go install. Things like having a ‘BitLocked’ USB drive are not present. I haven’t found anything else yet, however i wouldn’t be surprised if there were other missing features.
  • If you install Windows 8 on a non-certified USB drive, then the performance of Windows 8 is not what it should/could be. If you want to try Win8 out, then great, but don’t use the performance of a non-certified drive as a benchmark for how it is designed to run.
  • Running Windows 8, or any other operating system, off a USB will degrade the performance of your USB key. USB key performance degrades over time, based on the number of read/writes. Running an OS off of a USB key results in a lot of read/writes which will speed up this process. *Be warned!*
  • I am running this off a reasonably fast Patriot USB key and find performance to be reasonably good under the circumstances. If your USB is slower then it may not be as feasible to use.
  • Once you have created the VHD on the USB stick and done an ‘imagex’ of the ‘install.wim’ file, back it up to your pc. If you stuff up the install later on then it is much quicker to copy this back over than it is to recreate under diskpart and reinstall.

So then, you can now boot off the USB on a PC, but what if you want to try booting this USB on a virtual machine?

If, like me, you decide to try to boot the USB via a virtual machine, be warned that this may not work correctly or in a worst case, corrupt the USB installation of Windows.

I have only tried this out on two free products, being Oracle VirtualBox and VMWare Player, which both ‘natively’, do not support booting off a USB. (Note that other versions of VMWare support this and in fact a colleague of mine used the above process to create a USB drive and is now booting it off his MacBook with VMWare Fusion! Ahh the blasphemy of it! 8) (Let me know if you use a different virtualisation product and how it goes.)

Don’t Use Virtual Box For this! I love VirtualBox, however whilst it does not support booting off a USB, I have seen some articles that detail how to do this. Be warned, this is how I corrupted my USB installation. This may work for Linux or other OS’s, but if you do this with Win8 on a stick then be prepared to restore or recreate your *.VHD file!

It works using VMWare Player and PLOP! VMWare Player does not natively support booting off a USB, but if you mount the freeware PLOP boot loader image and boot off this, then this allows you to boot from a USB. Here are the instructions that I followed to get this working. http://en.kioskea.net/faq/7591-boot-from-your-usb-drive-under-vmware

So, you now have a shiny new version of Windows 8 Consumer Preview that is bootable off of a USB stick, either directly off your PC or under VMWare Player! I have been using it now a fair bit and am really starting to dig it. If you need some help with keyboard or mouse shortcuts then have a look at my previous post which details some tips. Getting Around Windows 8 with a Keyboard and Mouse

I am very grateful for the work done by Bennett Adelson in coming up with the bootable VHD on a stick approach for Win 8 and of course Microsoft for releasing what i think is a pretty awesome product! I haven’t come up with anything really new myself here, however putting it all together in one post may save you some time and research.

Have fun and feel free to let me know how you go!

Matt

Monday, May 21, 2012

The two USB bootable drives certified for Windows 8 to Go

From what i can work out, It looks like there are some pretty strict ‘rules’ around running Windows 8 ‘To Go’ in relation to the hardware you use. You should be able to use a USB hard drive ok, but when it comes to zip or flash drives, the rules are pretty strict.

It doesn’t just come down to the read and write speeds, but various other transfer rates for different sizes of files. It is also important that the ‘Removable Drive’ flag/bit is set on the stick and that the drive can be written many times without speed degrades to the stick over time.

Here are the only two usb ‘flash’ drives that are currently certified to run with Windows 8 ‘to go’. (This is not from official sources, just what i believe is the case).

http://legacy.kingston.com/wtg/

http://supertalent.com/WTG/

(The SuperTalent drive is more a SSD in a flash drive case. WOW!)

Over time, and once Windows 8 ships, there should be alot more drives that are supported. My advice now is to try Win 8 ‘to go’ on a usb drive, rather than a flash drive (unless you want to fork out some serious dough for one of the above drives). Alternatively, just run it in a virtual machine or natively / dual booting off your pc.

Note: If you go down the path of installing the windows 8 image to the usb with imagex and then booting and installing, then it will install but you will have reduced functionality around the windows store, using a live ID and windows update. (trust me, ive tried a few different ways to do this and get around the limitations)

I have read that it may be possible to create a vhd on the usb, install win8 to that and then setup a boot record on the usb to boot off the vhd. ive tried this, but have had no success .. yet. Let me know if you figure this, or another way, out.

Wednesday, May 16, 2012

Friday, March 16, 2012

Apps I use on my iPad

Games
Brothers in arms
Infinity Blade
Metal Storm Wingman
Obscura
Solitair
Angry Birds HD
Angry Bords Rio HD
Battlefield: Bad Company
Monopoly for Ipad
Real racing 2 HD
Scabble for ipad
Blackjack


Photography
Adobe photoshop express
Eye-fi
Flickr
Photopedia Heritage
Incredibooth
Pics
Iphoto
ColorUncovered
PhotoSync
PhotoSynth


Business
Blogpress
Be Write HD
Blogsy
Dictamus
Evernote
InShort
NAB Banking
Simplenote
Yammer
ActionNotes
Bamboo Paper - Notebook
Microsoft OneNote for Ipad
Penultimate
Quickoffice pro HD
Wunderlist
SimpleMind


Development
CodeToGo
iMockups for Ipad
Prompt
Github Lite
Pluralsight Training
CSS3Machine


Reference
Bloomberg for IPad
Google Earth
Houzz Interior Design
IMDB Movies and TV
Movies by Flixster
Realestate.com.au Australia
Tom's Hardware
Wikitude Augmented Reality
AccuWeather Free
CNN App for IPad
Dictionary.com
Domain.com.au Real Estate
Kayak HD
MobileRSS HD Free
SmartMoney Retirement Planner
Yellow Pages Australia for Ipad
ItunesU


Buy / Sell
eBay for Ipad
MyGumtree


Reading
Flipboard
IBooks
Instapaper
Kindle
GoodReader for Ipad
PC & Tech Authority
Readability


Restaurants and Cooking
Urbanspoon for Ipad
Epicurious


Kids (under 5 - boy and Girl)
Angelina Ballerina's new ballet teacher
Peekaboo Ocean HD
The cat in the hat
Create a car
Fireworks arcade
Flowers Slider Puzzel HD
Intro to Letters
Learn Sharks
Monkey Preschool Lunchbox
School A to Z
Shark Fingers! 3D Interactive
5-in-1 Matching Pack HD
March of the Dinosaurs
Nasa app HD
Robot Lab
Lego 4+
Kinectimals
Solar Walk
Star Walk


Utilities
Quota for Ipad
Skydrive
IceTV
Dropbox
Nightstand Central for iPad
Find my iphone
Google Search (has suedo CHROME desktop)
Wyse PocketCloud Pro
Big Calculator Free
PwSafe
Qrafter


Social
Facebook
Find my friends
Twitter
Skype for Ipad
Google+


Audio / Video
GoodPlayer
SoundCloud
TED
Justin.tv
TuneIn Radio
ABC IView
MuseBox Radio - Pandora
Planetary
Shuffler.fm